


Archive for Ekim 2015
Nikon D7100 tips and tricks
Nikon D7100 tips and tricks
Learn how to take control of your new Nikon D7100 and set it up to capture great images.
by Douglas Klostermann
Whether you are already shooting with a Nikon D7100 or still contemplating the purchase of one, you are likely well aware that it is a highly customizable and versatile camera. There are numerous Menu options and Custom Settings that you can make use of in order to fine-tune the camera to perfectly fit your needs, your shooting style, and the type of scene you are photographing.
The autofocus system and its modes can be adjusted and used to best capture the situation, the exposure metering system can be tweaked to achieve the exposures you desire, and the camera controls can be customized to work more seamlessly with how you photograph. In addition, the camera’s displays, white balance and ISO settings, and several other camera functions can all be adjusted according to your preferences.
I’ve spent a considerable amount of time with the Nikon D7100 as I researched and wrote my latest e-book, a user’s guide to the D7100 called Nikon D7100 Experience (PDF and ePub) (Kindle edition at Amazon.com), and below are some of the top “tips and tricks” I’ve discovered for setting up and photographing with this powerful dSLR. For more in-depth explanations of these tips as well as all of the other features of the D7100, be sure and have a look at Nikon D7100 Experience.

Detail of the Nikon D7100 dSLR camera.
1. Take Control of the D7100 Autofocus System
Before making use of some of the powerful features and functions specific to the D7100, one needs to first take control of the basic functions, including the autofocus system and exposure metering settings. This will help you to consistently capture sharp, well-exposed images. The D7100 boasts a 51 point autofocus system, upgraded from the 39 point system of the D7000. The large number of focus points and their positions in the viewfinder will allow you to focus exactly where you wish with minimal recomposing when working in Single-Servo AF-S mode, plus will better enable you to lock onto and track moving subjects throughout the frame when working in Continuous-Servo AF-C mode. The various Autofocus Modes (AF-S, AF-C, AF-A) and the autofocus AF-Area Modes (Single Point, Dynamic-Area, 3D-Tracking, etc.) may be intimidating at first, but once they are understood, it is easy to determine which combinations fit your shooting needs. If you have not previously used the D7000 or D600 you may also at first be confused by the autofocus controls with the AF switch and button near the base of the lens (used in conjunction with the Command Dials), but you should soon find that it is a quick and convenient way to change to your desired AF Mode and AF-Area Mode.

Autofocusing Modes - Making use of AF-C Autofocus Mode and 9-Point Dynamic-Area AF Area Mode to track and capture a moving subject. (Simulated view of the Nikon D7100 viewfinder - note that only the single, selected AF point will be visible in the viewfinder.)
In addition, the D7100 offers several Custom Settings to customize various aspect of the autofocus system - namely Custom Settings a1-a6. You can use these to tell the camera if achieving exact focus takes priority over maintaining the fastest continuous frame rate, how long the AF system continues to track a specific subject even if the subject momentarily moves away from the active AF point, and if the active AF points are illuminated in the viewfinder. You can even limit the number of selectable AF points to 11 if that helps you to more quickly or easily select your desired AF point.
2. Take Advantage of the new [i] Button
The D7100 adds the [i] Button, located on the rear of the camera, which gives you immediate access to the Information Display screen where many shooting settings and functions can be viewed and changed. You can press this [i] button to turn on the Information Display on the rear monitor and immediately access these settings with the use of the Multi Selector and OK Button. Press the [i] Button a second time or the INFO button to “de-activate” the settings and simply view the camera settings on the Information Display Screen. Or, after the INFO Button is pushed to display the camera settings of the Information Display screen on the rear monitor, this [i] Button is then pressed to “activate” the screen to enable changing the settings. In addition to the readily accessible camera buttons on the body of the D7100, this [i] Button and Information Display screen can be a quick and easy way to change many of the camera settings without having to navigate into the menus, such as Image Area, Active D-Lighting, High ISO Noise Reduction, and Long Exposure Noise Reduction. Plus you can use this screen to quickly customize the function of the Depth of Field Preview Button, AE-L/AF-L Button, and Fn Button.
![Nikon D7100 [i] button](http://images.cameratico.com/media/images/articles/27/3-Nikon-D7100-i-button.jpg)
Detail of the Nikon D7100 with [i] Button shown at lower-left.
The [i] Button can also be used during Live View shooting, Movie shooting, and Image Playback to readily access and change a number of applicable functions. During Live View shooting it can be pressed to access settings including Image Area, Image Quality, Image Size, Picture Control, Active D-Lighting, Remote Control Mode, and Monitor Brightness. During Movie shooting, the [i] Button will access additional movie settings such as Frame Size and Frame Rate, Movie Quality,Microphone sensitivity, Destination for which SD card slot movies will be saved to, and Headphone Volume. Plus, when reviewing your still images or movies during playback, the [i] Button is used to access the image Retouch Menu or to display movie edit options.

Information Display shown on the rear LCD Monitor (left). Press the [i] Button to “activate” the screen and access/ change various settings (right). Select and change the settings along the bottom of the screen, such as the Picture Controls shown highlighted here.
3. Beware of Menu Conflicts
As with most current dSLR cameras, the D7100 has a couple menu settings and function “quirks” or conflicts that may drive you crazy if you are not aware why they are occurring. Most notably, some settings will be greyed-out or inaccessible in the menus and you will not be able to select them when working in one of the auto shooting modes, if not using an optional accessory, or if a “conflicting” setting is enabled. An example includes HDR shooting, which is not accessible when the camera is set to capture files in the (NEF)RAW or (NEF)RAW+JPEG image formats. You must be working in JPEG only. Or, since White Balance Bracketing and RAW format are incompatible, if the camera is set for White Balance Bracketing and (NEF)RAW or (NEF)RAW+JPEG image formats, the BKT Button will not actually allow you to access bracketing. These are generally not arbitrary quirks, but are typically logical conflicts.
Another set of conflicts involves the customization of some buttons (Fn Button, Preview Button, and AE-L/AF-L Button) where you have the option to set a separate Press function (where you simply press the button) and a Press+Dial function (where you press the button and turn a dial in order to change a setting). While it at first seems handy that the D7100 menus separated the Press from the Press+Dial functions thus allowing you more options, you will soon find that most of them conflict with each other, and in reality you will likely only be able to set either a Pressfunction or a Press+Dial function.

Custom Setting f2: Assign Function (Fn) Button, with the “Press” and “Press+Command Dials” options. Some of the “Press” options shown at right.
4. Extend Your Reach with the 1.3x Crop Mode
The D7100 allows you to shoot in DX mode, making full use of the camera’s APS-C sized image sensor, and also offers a new 1.3x crop mode that uses a smaller part of the sensor but provides some added benefits. This can be set in the Image Area item of the Shooting Menu, and by enabling the 1.3x crop setting you will change the aspect ratio (very slightly) and angle of view (dramatically) of your resulting images – basically cropping your photos from what you see in the full viewfinder to what you see inside the 1.3x outline that is shown in the viewfinder when this feature is enabled.
The first advantage of the 1.3x crop is that it will allow you to “get closer” to the action by virtually extending the reach of your lenses. This can be particularly helpful when using a telephoto lens to capture sports, wildlife, or bird images where the subject is at a significant distance from you. It will allow, for example, your 200mm focal length lens to act as nearly a 400mm focal length. (Since the DX frame is already a 1.5x crop sensor in relation to a full-frame 35mm sized sensor, the additional 1.3x crop effectively doubles the focal length of the lens: 200mm x 1.5 x 1.3 = 390mm.)

Simulated D7100 viewfinder view, showing the full size DX Image Area and the approximate size of the cropped 1.3x image indicated by the black rectangle surrounding the AF brackets. Location of all the Focus Points shown for reference. The 1.3x crop will, in effect, allow you to extend the reach of your lens and get closer to the action, as well as nearly fill the width of the active frame with the Focus Points.
The second advantage is that with the 1.3x crop, the area of the autofocus points as seen in the viewfinder reaches nearly to the sides of the effective frame. This will allow you to track and capture a moving subject throughout almost the entire width of the active frame (when using continuous AF-C Focus Mode), or enable you to focus on and capture a still subject most anywhere in the frame without having to lock focus and reframe (when using single-shot AF-SFocus Mode).
A third advantage of working in 1.3x crop mode is that the Continuous High shooting speed increases from 6 frames per second to 7 fps (when shooting in JPEG or in 12-bit NEF-RAW), allowing you to capture slightly more images in a quick burst.
The disadvantage of the 1.3x crop is that you will only be using 15 megapixels of your 24.1 megapixel sensor, so you will have slightly reduced image resolution. The end result will be as if you cropped the image in post-processing. However, 15 MP is still a very high resolution, and for many shooting situations and image needs this may be more than sufficient.
5. Interval Timer and Time-Lapse Shooting
The Interval Timer Shooting function can be used to take a continuous series of photographs at each specified time interval, for a set number of intervals, with the intervals to begin either immediately or at a set time. It can be used to take these multiple series of shots over several minutes or hours – for example, 3 photos in a row every 10 minutes, for 12 intervals. This will result in a total of 36 photos, as the camera will calculate and show you. This Interval Timer Shooting menu can also be used for time-lapse photography by taking a series of individual photos over an extended period of minutes or hours, with just one photo per interval, which can then be combined into a time-lapse movie (using software designed for this such as Photoshop).

Interval Timer Shooting menus - Left: Setting the Interval time period between shots, here set for 10 minutes. Right: Setting the number of intervals and the number of shots to be taken at the start of each interval. Here, 12 intervals are set, with 3 shots to be taken each interval, for a total of 36 shots. The intervals are to start immediately, with the time between intervals as 10 minutes. The current time is 16:17 (which is shown in case you wish to set the Start Time).
Use the Interval Timer Shooting menu to choose all of your desired settings. Ideally, set up your camera on a tripod for the duration of Interval Timer Shooting, and use the included Eyepiece Cap to cover the viewfinder and prevent stray light from altering the exposure. The camera will need to focus before taking the shots, so it may be best to pre-focus the camera and then set the camera and lens to manual focus.
For time-lapse photography you will need to take images at short intervals, with just one image per interval, for numerous intervals, in order to create a long and effective movie. For example, a photo every 30 seconds, for 8 hours. Be sure to have a large memory card or cards in the camera, and set the Role Played by Card in Slot 2 for Overflow if necessary. In the optional time-lapse software you will set the movie frame rate, and that setting (24fps, 30fps, etc.) will determine to total length of the movie. There are time-lapse formulas and apps, which you can use to plug-in your variables and determine either the settings you will need to use, or the resulting length of the final movie.
6. Set up your Dual SD Memory Card Slots
The two memory card slots of the D7100 can function in a couple different ways, including using one for saving RAW files and the other for JPEG files, saving all your images to both cards simultaneously, using the second card as overflow when the first one fills up, or saving still images to one and movies to the other. You can set this up in the Shooting Menu under Role played by card in slot 2. To set how the cards function for saving videos, use the Shooting Menu > Movie Settings > Destination.
7. Use Picture Controls for your JPEG Images
If you are capturing your images as (NEF) RAW or JPEG files and will be post-processing your images in software such as Photoshop or Lightroom, then you don’t necessarily need to worry about Picture Controls. If that is the case, set the Picture Control for Standard or Neutral so that the images that you view on the camera’s rear LCD screen will be close to how they will appear in the actual RAW image file that you open on your computer. However if you are not post-processing, you will want the images to come out of the camera looking as you want them to, so you will need to set, customize, or create a Picture Control that best creates your desired look. Adjust the sharpening, contrast, brightness, and saturation to achieve the look you are after. Save the Picture Controls you have created to access them later. You can even create your own styles using the included software, or find them online and download them. There are Picture Controls to be found online that recreate the look of various traditional types of film including Kodachrome and Velvia.

Picture Controls - If shooting in JPEG, choose a Picture Control (left), and adjust its parameters (right) to achieve the final look you desire for your images.
8. Customize the Exposure Compensation Controls
Exposure Compensation (EC) can be used to adjust the camera’s exposure settings in order to achieve the final exposure that you desire. Explore the various options of Custom Setting b3: Easy Exposure Compensation to customize exactly how the exposure compensation controls works. You can set the camera so that you press the Exposure Compensation Button first before turning a dial to change EC, or have it set so that you can simply turn a dial to quickly and directly change EC. You can even select which dial you use with Custom Setting f5. And you can set it so that the EC amount that you dialed-in stays set for the subsequent shots, or that it is automatically reset to zero, depending on which controls you choose to use to set EC.
This last option is the most sophisticated and most flexible, and may be the best one to learn and take advantage of. Using this option, On (Auto reset), you can choose to turn a dial to directly adjust EC, but your EC setting will be reset when the camera or exposure meter turns off. This is because you can still continue to use the Exposure Compensation Button with a Command Dial to set EC, but by setting it this way, EC will not be reset when the camera or meter turns off. Exposure Compensation will only be automatically reset if you set it directly using the dial without the button. So if you wish to use EC for just one shot, you can adjust EC with just the dial. But if you wish to take a series of shots with the same adjusted EC, you can use the button/ dial combination to set it more “permanently.” Pretty powerful stuff! This is why you got the D7100, right? So that you can take advantage of these sophisticated controls!
9. Fine-Tune the Exposure Metering Modes
While the Matrix Metering Mode will do an excellent job of determining the proper exposure for your images the majority of the time, there are some situations where you may wish to use the other exposure modes - Center-Weighted Metering and Spot Metering. This includes dramatically backlit situations, subjects with a dramatically dark background, scenes that contain a wide range of highlights and shadow areas, or other dramatic lighting situations.

Metering Modes - A simulated view of the D7100 Viewfinder showing the area of the 3.5mm Spot Metering circle and the larger Center-Weighted circle (which can be changed in the Custom Settings). AF points and 1.3x crop lines shown for reference.
If you find that you are consistently not quite happy with how the camera’s meter is determining the exposure settings when making use of any of these modes, you can make fine-tune adjustments to the metering system using Custom Setting b5: Fine-tune optimal exposure. This is not an exposure compensation adjustment, but rather a “behind the scenes” fine-tuning of how the camera’s meter will determine the exposure settings, independently for each of the different Exposure Metering Modes (Matrix, Center-Weighted Average, Spot). If you find that your images are always typically being slightly underexposed or overexposed when using a specific metering mode, adjust this accordingly so that you don’t have to use exposure compensation every time you use that metering mode. For example, you may find that Center-Weighted Metering delivers great exposures, but you would prefer that the images taken with Spot Metering were 1/3 EV (1/3 step) underexposed all the time. If that is the case, you would adjust Spot metering to -2/6 using this menu. If you make use of this fine-tune adjustment, you can still use exposure compensation in any situation in addition to this fine-tune adjustment.

Custom Setting b5: Fine-Tune Optimal Exposure, used to adjust the exposures of each metering mode to your preference, “behind the scenes,” so that exposure compensation is not needed each time you use that metering mode (left). Fine-tuning Spot Metering to underexpose by -1/3 EV (right) - not recommended, just an example!
10. Put Your Most Used Settings in My Menu
Instead of navigating into the Menus and Custom Settings all the time to find your most used settings, you can create your own custom menu called My Menu, which is then quickly and easily accessed with the Menu Button. You can even decide what order to list the items in. Set up My Menu by selecting Choose Tab in the Recent Settings menu, and select My Menu. Then Add Itemsand Rank Items in the order you desire. You can add items from most all of the Menus and Custom Settings Menus, such as maybe Movie Settings, some of the Flash Control settings, or White Balance for easier access to additional white balance options and fine-tuning. If you frequently make use of a feature such as changing the Image Area from DX to 1.3x, use Interval Timer Shooting, or Multiple Exposures add these to your My Menu.
There are numerous other settings you can customize, as well as many other important features to learn and take advantage of with the Nikon D7100, such as making use of the Auto ISO settings, the built-in HDR and Multiple Exposure features, verifying your exposures with the histogram display, temporarily Spot Metering with the touch of a button, and tweaking the white balance settings. You have a powerful camera in your hands, so why not learn to take advantage of its advanced features?! Have a look at my guide Nikon D7100 Experience (PDF and ePub) (Kindle edition at Amazon.com) to learn more about the settings, features, and controls mentioned here, and much more. This book not only explains the features, functions, and controls of the camera, but more importantly explains when and why you will want to use them in your photography.Take control of your D7100 and the images you create!
About the author

Douglas Klostermann is a travel, culture, and humanitarian photographer, as well as the best-selling author of Full Stop photography guides including andCanon 5D Mark III Experience and Nikon D7100 Experience.
You can preview and purchase his guides on his Full Stop website or Kindle editions at Amazon.com, learn more about photography techniques and equipment on his blogPicturing Change, and view his photography atdojoklo.com.
Master fill flash in 4 easy steps
Master fill flash in 4 easy steps

Flash can be essential in low light, particularly when you’re shooting living subjects. But it often ends up being a necessary evil, killing the atmosphere. Ironically, flash is often of more creative use in the hours of daylight.
Sometimes called ‘synchro sun’, and better known as ‘fill flash’, a burst of artificial light can be effective in practically any outdoor situation. What’s more, you don’t need any specialist kit – you can make do with the pop-up flash that comes built into most popular DSLRs.
The main restriction with the technique is that it only works if you’re the right distance away from the right subject. A range of 2-12ft is ideal, so the trick is great for portraits.
In bright sunshine, when you might think there’s enough light anyway, flash helps reduce the contrast on a subject, filling in the shadows that make eye sockets look dark and hide other facial details. On a dull, overcast day, a burst of flash has the opposite effect, adding contrast and making portraits more three-dimensional and colourful. And whatever the weather, the flash also gives a sparkle to people’s eyes by adding bright ‘catchlight’ reflections.
In its most basic form there’s little more to the technique than firing the pop-up flash and shooting. You need to be using the right exposure mode, though. Program (P) or Aperture Priority (A) work best if you have autofocus turned on and are using standard evaluative metering.
For a more creative fill flash effect, try switching to Aperture Priority (Av) mode. You can adjust the aperture as required and the shutter speed will change automatically to suit the ambient lighting conditions. Longer shutter speeds will be selected as necessary for smaller apertures or darker surroundings, with the added bonus of blurring background movement.
Meanwhile, the main foreground subject can be kept sharp by the very short duration of the flash. Watch out for large apertures (such as f/4) in bright conditions as there is a danger the background will be overexposed, as the top shutter speed your camera can use with flash is usually 1/200 sec or 1/250 sec (depending on the model).
If this proves a problem the shutter speed will flash in the viewfinder – and you then need to lower the ISO or set a narrower aperture until the shutter speed readout stops flashing.
The beauty of fill flash is that you combine two exposures – one taken using daylight, and the other with flash. By varying the settings you can make the fill flash effect stronger or weaker, which is handy for increasing or decreasing the brightness of the background independently of the subject. Let’s see how it’s done…

Our portrait taken without fill flash
Get perfect portraits with fill flash

01 Push for pop-up
For fill flash, the easiest exposure mode to use is Program (P). This sets the aperture and shutter speed for you, for a balanced exposure with flash. Use matrix metering, and the AF points so that the camera knows where the subject is in the frame. Now pop up the flash.
For fill flash, the easiest exposure mode to use is Program (P). This sets the aperture and shutter speed for you, for a balanced exposure with flash. Use matrix metering, and the AF points so that the camera knows where the subject is in the frame. Now pop up the flash.

02 Step down
Auto exposure is often perfect, but you can play with the settings to make the fill flash effect stronger or more subtle. To make the background look darker – to make a sky look more blue, say – you need exposure compensation. Try -1.0 (one stop underexposed).
Auto exposure is often perfect, but you can play with the settings to make the fill flash effect stronger or more subtle. To make the background look darker – to make a sky look more blue, say – you need exposure compensation. Try -1.0 (one stop underexposed).

03 Play with power
The exposure compensation will make the foreground and background darker. To ensure that the subject is properly lit, adjust the flash power. Press the flash pop-up button and turn the front dial. On cameras such as the D3100, press +/- Exposure Compensation, too.
The exposure compensation will make the foreground and background darker. To ensure that the subject is properly lit, adjust the flash power. Press the flash pop-up button and turn the front dial. On cameras such as the D3100, press +/- Exposure Compensation, too.

04 Finalise settings
Set the Flash Exposure Compensation to +1.0 (one stop over). This is the maximum allowed, although you can turn the power down to -3.0). Take a picture and the subject will be properly exposed but the background will be darkened by the new setting.
Set the Flash Exposure Compensation to +1.0 (one stop over). This is the maximum allowed, although you can turn the power down to -3.0). Take a picture and the subject will be properly exposed but the background will be darkened by the new setting.
Top tips for using fill flash

01 Take it slow
Leave your pop-up flash set to Slow for better fill flash shots at dusk. Just press the pop-up flash button and turn the dial.
Leave your pop-up flash set to Slow for better fill flash shots at dusk. Just press the pop-up flash button and turn the dial.

02 Pump it up
To increase the range of the built-in flash, change the ISO. Going from 100 to 800 ups the range from 2.1m to 6m at f/5.6.
To increase the range of the built-in flash, change the ISO. Going from 100 to 800 ups the range from 2.1m to 6m at f/5.6.

03 Watch the hood
Lens hoods can cause problems with fill flash, particularly when you’re close to a subject. To avoid shadows, take hoods off!
Lens hoods can cause problems with fill flash, particularly when you’re close to a subject. To avoid shadows, take hoods off!

04 Beware of alerts
For more exposure control use Aperture Priority (A). If you see ‘Hi’ in the shutter speed readout, reduce the ISO or step down aperture.
For more exposure control use Aperture Priority (A). If you see ‘Hi’ in the shutter speed readout, reduce the ISO or step down aperture.

05 Max control
For full pop-up creativity, set ‘Flash cntrl for built-in flash’ to Manual in the Custom Settings menu. Then expose manually.
For full pop-up creativity, set ‘Flash cntrl for built-in flash’ to Manual in the Custom Settings menu. Then expose manually.
Nikon D7100: From Snapshots to Great Shots
Nikon D7100: The Professional Modes

http://www.peachpit.com/articles/article.aspx?p=2109324&seqNum=1
If you really want to take that next step in controlling your photography, it is essential that you understand not only how to control aperture and shutter speed, but why you are controlling them. John Batdorff explores the modes of the Nikon D7100, including Programmed Auto Mode, Shutter Priority Mode, Aperture Priority Mode, and Manual Mode.
This chapter is from the book
Taking Your Photography to the Next Level
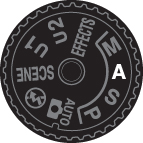
If you talk to professional photographers, you will find that the majority of them use a few selective modes that offer the greatest amount of control over their photography. To anyone who has been involved with photography for any period of time, these modes are the backbones of the art. They allow you to influence two of the most important factors in taking great photographs: aperture and shutter speed. To access these modes, you simply turn the Mode dial to one of the letter-designated modes and begin shooting. But wouldn’t it be nice to know exactly what those modes control and how to make them do our bidding? Well, if you really want to take that next step in controlling your photography, it is essential that you understand not only how to control these modes but why you are controlling them. So let’s move that Mode dial to the first of our professional modes, or as I like to think of it, professional light: Programmed Auto mode.
Poring Over the Picture
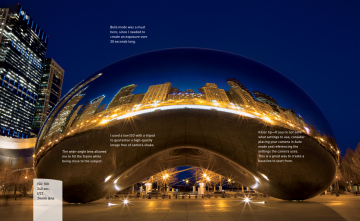
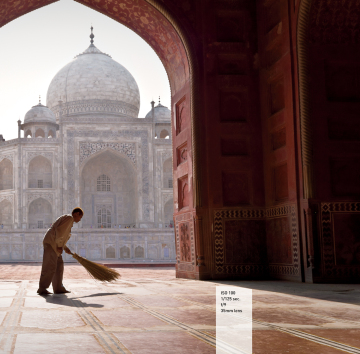
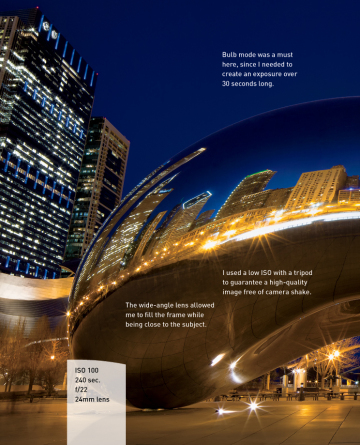
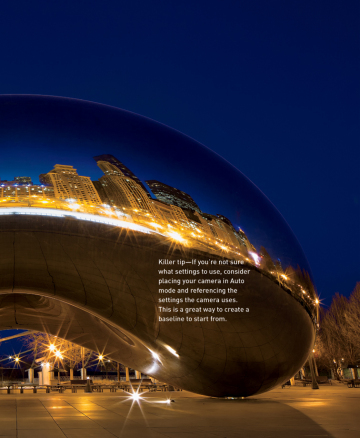
Cloud’s Gate, affectionately known by Chicago locals as “the Bean,” is one of my favorite subjects to shoot in downtown Chicago. The Bean is made up of 168 stainless steel plates welded together, ground, and then polished to create very reflective surfaces. The trick with this shot is finding the right time of day to photograph when no one is around. After spending nearly four hours on location, I finally got lucky and captured the image I was looking for.
P: Programmed Auto Mode
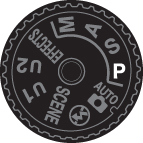
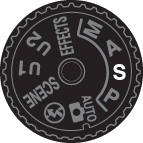
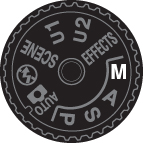
I call Programmed Auto mode, or P mode, “professional light” because it’s a great mode to become familiar with as you transition from the automatic or scene modes (Figure 4.1) to Aperture Priority, Shutter Priority, or Manual mode. There is a reason that Programmed Auto mode is only one click away from the automatic modes: With respect to apertures and shutter speeds, the camera is doing most of the thinking for you. So if that is the case, why even bother with P mode?
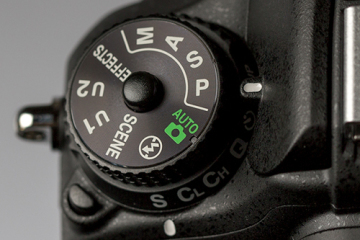
Figure 4.1. Use Programmed Auto mode for flexible control and as a great place to start learning professional modes.
First, let me say that I rarely use Programmed Auto mode, because it just doesn’t give as much control over the image-making process as the other professional modes. However, we all start somewhere, and much like many of you, I started fully automatic, moved to Programmed Auto mode, and now hang out in Aperture Priority most of the time. There are still occasions when Programmed Auto mode comes in handy, like when I am shooting in widely changing lighting conditions and I don’t have the time to think through all of my options, or I’m not very concerned with having ultimate control of the scene. Think of a picnic outdoors in a partial shade and sun environment. I want great-looking pictures, but I’m not looking for anything to hang in a museum. If that’s the scenario, why choose P mode over one of the scene modes? Because it gives me choices and control that none of the scene modes can deliver.
When to use Programmed Auto (P) Mode Instead of the Automatic Scene and Effects Modes
It’s graduation time, and you’re ready to move on to a more advanced mode but not quite ready to jump in with both feet. When does Programmed Auto mode come in handy?
- When shooting in a casual environment where quick adjustments are needed.
- When you want more control over the ISO.
- If you want to make corrections to the white balance.
- When you want to take advantage of the Flexible Program mode and change shutter speeds via aperture. Move the main Command dial to the left for small apertures to increase depth of field, or rotate the dial to the right for large apertures to create a shallow depth of field.
Let’s go back to our picnic scenario. As I said, the light is moving from deep shadow to bright sunlight, which means that the camera is trying to balance our three photo factors (ISO, aperture, and shutter speed) to make a good exposure. From Chapter 1, we know that Auto ISO is generally not what we want except when shooting in Auto mode, so we have already turned that feature off (you did turn it off, didn’t you?). Well, in P mode, you can choose which ISO you would like the camera to base its exposure on. The lower the ISO number, the better the quality of the photographs, but the less light sensitive the camera becomes. It’s a balancing act, with the main goal always being to keep the ISO as low as possible—too low an ISO, and we will get camera shake in our images from a long shutter speed; too high an ISO, and we will have an unacceptable amount of digital noise (Figures 4.2 and 4.3). For now, let’s go ahead and select ISO 400 so that we provide enough sensitivity for those shadows while allowing the camera to use shutter speeds that are fast enough to stop motion.
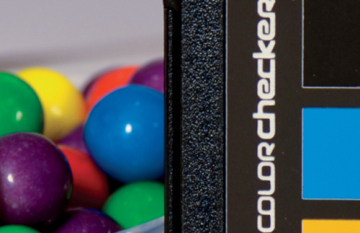
Figure 4.2. Look closely and you’ll notice the image is grainy, or has small pixels. That’s digital noise. Now, look at the same image taken at a lower 100 ISO.
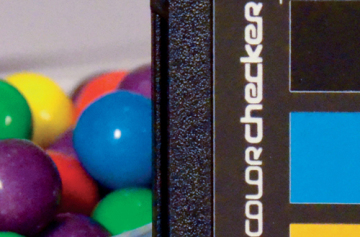
Figure 4.3. Notice the detail in the black plastic and how little noise is in the image.
With the ISO selected, we can now make use of the other controls built into Programmed Auto mode. By rotating the main Command dial, we now have the ability to shift the program settings. Remember, your camera is using the internal meter to pick what it deems suitable exposure values, but sometimes it doesn’t know what it’s looking at and how you want those values applied (Figures 4.4 and 4.5). With the program shift, you can influence what the shot will look like. Do you need faster shutter speeds in order to stop the action? Just turn the main Command dial to the right. Do you want a smaller aperture so that you get a narrow depth of field? Turn the dial to the left until you get the desired aperture. The camera shifts the shutter speed and aperture accordingly to get a proper exposure.

Figure 4.4. This image was shot using the Programmed Auto mode. In this image the shutter was faster because the image is lighter than Figure 4.5. Because the image is lighter, the camera needs less time to expose, so the shutter opens and closes very quickly—in this case, 1/160 of a second quicker.
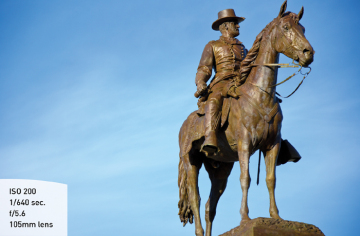
Figure 4.5. When we zoom in on the bronze statue, our image becomes darker than in Figure 4.4 because there is less of the bright blue sky. The camera needs more light to properly expose the image, so the shutter is left open longer.
You will also notice that a small star will appear above the letter P in the viewfinder and the rear display if you rotate the main Command dial. This star is an indication that you modified the exposure from the one the camera chose. To go back to the default Programmed Auto exposure, simply turn the dial until the star goes away or switch to a different mode and then back to P mode again.
Let’s set up the camera for Programmed Auto mode and see how we can make all of this come together.
Setting Up and Shooting in Programmed Auto Mode
- Turn your camera on and then turn the Mode dial to align the P with the indicator line.
- Select your ISO by pressing and holding the ISO button on the back left of the camera while rotating the main Command dial with your thumb.
- The ISO will appear on the top display. Choose your desired ISO, and release the ISO button on the left to lock in the change.
- Point the camera at your subject and then activate the camera meter by depressing the shutter button halfway.
- View the exposure information in the bottom area of the viewfinder or by looking at the top display panel.
- While the meter is activated, use your thumb to roll the main Command dial left and right to see the changed exposure values.
- Select the exposure that is right for you and start clicking. (Don’t worry if you aren’t sure what the right exposure is yet. We will work on making the right choices for those great shots beginning with the next chapter.)
S: Shutter Priority Mode
S mode is what we photographers commonly refer to as Shutter Priority mode. Just as the name implies, it is the mode that prioritizes or places major emphasis on the shutter speed above all other camera settings (Figure 4.6).
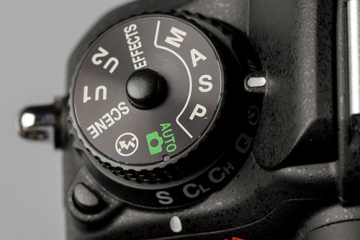
Figure 4.6. Shutter Priority mode is great for freezing or showing motion. Use this mode when your shutter speed is of utmost importance.
Just as with Programmed Auto mode, Shutter Priority mode gives us more freedom to control certain aspects of our photography. In this case, we are talking about shutter speed. The selected shutter speed determines just how long you expose your camera’s sensor to light. The longer it remains open, the more time your sensor has to gather light.
The shutter speed also, to a large degree, determines how sharp your photographs are. Even though an image may appear sharply in focus, any movement by the subject or the camera while the shutter is open can blur the image. If you think about it, when you are trying to show motion, you want a slower shutter speed because it blurs the image.
A good rule of thumb for avoiding blurry images is to always use a shutter speed as fast as your focal length. For instance, if I’m out photographing my daughter with an 80mm lens, then I’ll want to make sure my shutter speed is at least 1/120 of a second, taking into account that the camera is not full frame, so the actual focal length is greater than the focal length of the lens. Anything less than that might cause camera shake (even if you’re equipped with biceps as big as Popeye’s). The D7100 has a 1.3x magnification, so if your focal length is 100mm, you shouldn’t shoot less than 1/150 of a second.
When to use Shutter Priority (S) Mode
- When working with fast-moving subjects and you want to freeze the action (Figure 4.7); much more on this is in Chapter 5
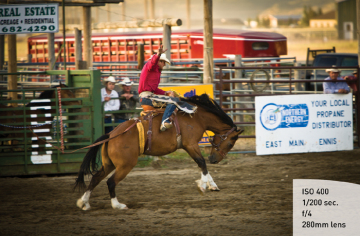 Figure 4.7. Whenever I’m planning on freezing motion, I always make sure I’m shooting with a fast shutter speed. I knew the rodeo would be giving me lots of opportunities for that kind of action, so I set my speed to be very fast so that I could capture every movement of the horse and the rider.
 - When you want to emphasize movement in your subject with motion blur (Figure 4.8)
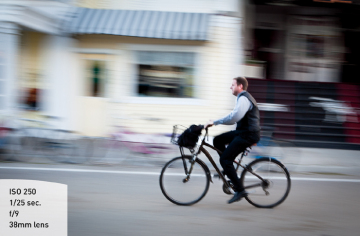 Figure 4.8. If you’re photographing a fast-moving subject and wish to convey a sense of motion, always use a slower shutter. In this image I wanted to blur the background while freezing the subject, so it required me to use a slower shutter while following, or “panning,” with the subject in focus.
 - When you want to use a long exposure to gather light over a long period of time (Figure 4.9); more on this is in Chapter 8
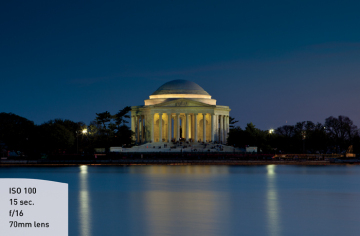 Figure 4.9. I took this very long exposure of the Jefferson Monument in Washington, DC, using a tripod and a cable release. There’s no way I could have held the camera steady for 15 seconds! A tripod is a must for long exposures.
 - When you want to create that smooth-looking water in a waterfall or rapids in a creek or river (Figure 4.10)
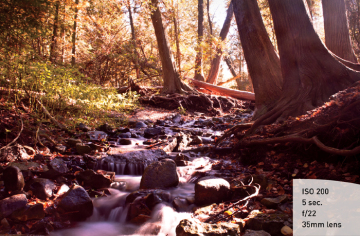 Figure 4.10. I used a cable release and tripod to photograph this small creek on Mackinac Island, Michigan. I was able to create a smooth look to the water by increasing the length of the exposure using Shutter Priority mode.
As you can see, the subject of your photo usually determines whether or not you will use Shutter Priority mode. It is important that you be able to previsualize the result of using a particular shutter speed. The great thing about shooting with digital cameras is that you get instant feedback by viewing your shot on the LCD. But what if your subject won’t give you a do-over? Such is often the case when shooting sporting events. It’s not like you can go ask your daughter to score another goal in her soccer game because your photograph was blurry from a slow shutter speed. This is why it’s important to know what those speeds represent in terms of their capabilities to stop the action and deliver a blur-free shot.
First, let’s examine just how much control you have over the shutter speeds. The D7100 has a shutter speed range from 1/8000 of a second all the way down to 30 seconds. With that much latitude, you should have enough control to capture almost any subject. The other thing to think about is that Shutter Priority mode is considered a semiautomatic mode. That means that you are taking control over one aspect of the total exposure while the camera handles the other. In this instance, you are controlling the shutter speed and the camera is controlling the aperture. This is important, because there will be times that you want to use a particular shutter speed but your lens won’t be able to accommodate your request.
For example, you might encounter this problem when shooting in low-light situations: If you are shooting a fast-moving subject that will blur at a shutter speed slower than 1/125 of a second but your lens’s largest aperture is f/3.5, you might find your aperture display in your viewfinder and the rear LCD panel will display the word “Lo.” This is your warning that there won’t be enough light available for the shot—due to the limitations of the lens—so your picture will be underexposed. Your only remedy is to increase your ISO to accommodate the shutter speed needed.
Another case where you might run into this situation is when you are shooting moving water. To get that look of smooth, flowing water, it’s usually necessary to use a shutter speed at least as slow as 1/15 of a second. If your waterfall is in full sunlight, you may get a message that reads “Hi” because the lens you are using only stops down to f/22 at its smallest opening. In this instance, your camera is warning you that you will be overexposing your image. There are workarounds for these problems, which we will discuss later, but it is important to know that there can be limitations when using Shutter Priority mode.
Setting Up and Shooting in Shutter Priority Mode
- Turn your camera on and then turn the Mode dial to align the S with the indicator line.
- Select your ISO by pressing and holding the ISO button on the back left of the camera while rotating the main Command dial with your thumb.
- The ISO will appear on the top display. Choose your desired ISO, and release the ISO button on the left to lock in the change.
- Point the camera at your subject and then activate the camera meter by depressing the shutter button halfway.
- View the exposure information in the bottom area of the viewfinder or by looking at the top display panel.
- While the meter is activated, use your thumb to roll the main Command dial left and right to see the changed exposure values. Roll the dial to the right for faster shutter speeds and to the left for slower speeds.
A: Aperture Priority Mode
Probably the mode most widely used by professional photographers, Aperture Priority is one of my personal favorites, and I believe that it will quickly become one of yours. Aperture Priority mode is also deemed a semiautomatic mode because it allows you to once again control one factor of exposure while the camera adjusts for the other (Figure 4.11).
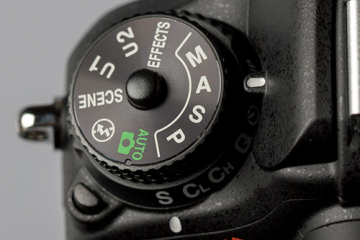
Figure 4.11. Use Aperture Priority mode when you need to control depth of field. This is my favorite shooting mode.
Why is this one of my favorite modes? It’s because the aperture of your lens dictates depth of field. Depth of field, along with composition, is a major factor in how you direct attention to what matters in your image. It is the controlling factor of how much area in your image is sharp. If you want to isolate a subject from the background, such as when shooting a portrait, you can use a large aperture (low f-stop number) to keep the focus on your subject and make both the foreground and background blurry. If you want to keep the entire scene sharply focused, as with a landscape scene, then using a small aperture (high f-stop number) will render the greatest amount of depth of field possible.
When to use Aperture Priority (A) Mode
- When shooting portraits or wildlife (Figure 4.12)
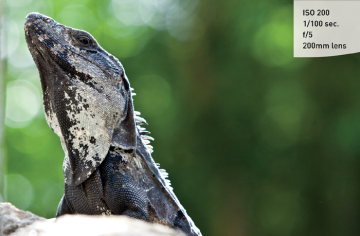 Figure 4.12. The lizard was very still so I was able to use a tripod and zoom in tight. The large aperture helped create a smooth, blurry background, also known as bokeh.
 - When shooting most landscape photography (Figure 4.13)
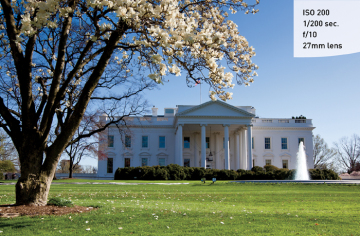 Figure 4.13. The smaller aperture setting brings sharpness to near and far objects.
 - When shooting in bright skies consider silhouetting an image (Figure 4.14)
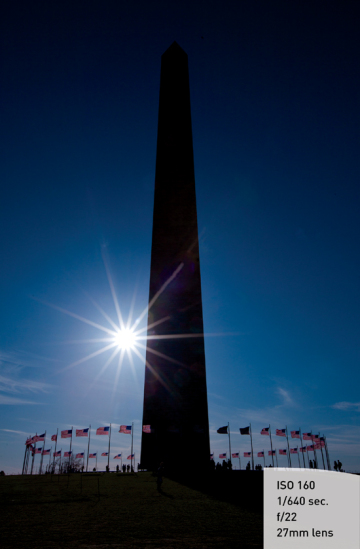 Figure 4.14. Using a very small aperture on a clear blue day, I was able to create this sunburst. Typically f/16 or higher will do the trick! Give it a try. The key ingredient is a clear sky, because clouds will diffuse the sun.
 - When shooting cityscape photography, which often benefits from a large depth of field (Figure 4.15)
 Figure 4.15. I wanted the foreground as well as the background in focus, so I used a wide-angle lens combined with a small aperture to maintain focus throughout the image. This is called a deep depth of field.
I strongly recommend knowing your lens’s aperture rating. Every lens has a marking on it with a number; f/1.4, f/2.8, or f/5.6 are all very common maximum aperture sizes. This number simply means the largest aperture your lens supports is f/1.4, f/2.8, or f/5.6, respectively. The D7100 kit ships with a standard 18–105mm lens with an f/3.5–f/5.6 variable maximum aperture (Figure 4.16).
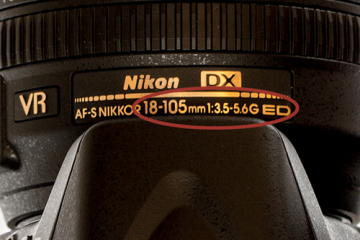
Figure 4.16. It’s important to know the focal range and maximum aperture of your lens.
Knowing the limits of your lens aperture is crucial when using Aperture Priority. As a general rule, the lower the number on the lens, the “faster” it is (because it allows more light in to expose the image, thus reducing the amount of shutter time) and the sharper the image is. Typically, fast lenses are heavier and more expensive, but they’re well worth the investment if you find yourself shooting in low-light conditions. The larger the aperture is, the better the exposure without having to increase ISO and introduce digital noise.
On the other hand, bright scenes require the use of a small aperture (such as f/16 or f/22), especially if you want to use a slower shutter speed. That small opening reduces the amount of incoming light, and this reduction of light requires that the shutter stay open longer.
Setting Up and Shooting in Aperture Priority Mode
- Turn your camera on and then turn the Mode dial to align the A with the indicator line.
- Select your ISO by pressing and holding the ISO button on the back left of the camera while rotating the main Command dial with your thumb.
- The ISO will appear on the top display. Choose your desired ISO, and release the ISO button on the left to lock in the change.
- Point the camera at your subject and then activate the camera meter by depressing the shutter button halfway.
- View the exposure information in the bottom area of the viewfinder or by looking at the top display panel.
- While the meter is activated, use your finger to roll the Sub-command dial left and right to see the changed exposure values. Roll the dial to the right for a smaller aperture (higher f-stop number) and to the left for a larger aperture (lower f-stop number).
M: Manual Mode
Manual mode is all about control. Keep in mind, this mode was not designed for those of us who want to go on autopilot and shoot to our heart’s content. It was designed to allow the photographer to take complete control of shutter speed and aperture (Figure 4.17). The camera doesn’t do any of the work for you.

Figure 4.17. For ultimate control of shutter speed and aperture, use Manual mode.
When you have your camera set to Manual (M) mode, the camera meter will give you a reading of the scene you are photographing. It’s your job, though, to set both the f-stop (aperture) and the shutter speed to achieve a correct exposure. If you need a faster shutter speed, you will have to make the reciprocal change to your f-stop. Using any other mode, such as Shutter Priority or Aperture Priority, would mean that you just have to worry about one of these changes, but Manual mode means you have to do it all yourself. This can be a little challenging at first, but after a while you will have a complete understanding of how each change affects your exposure, which will, in turn, improve the way that you use the other modes.
When to use Manual (M) Mode
- When lighting and exposure get tricky (Figure 4.18). Shooting indoors through glass can be especially tricky. The wonderful thing about your D7100 is that it has an incredible ISO range with relatively low digital noise.
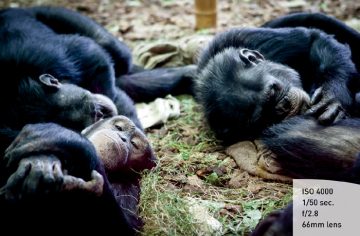 Figure 4.18. I took this image of apes at a zoo behind glass and wanted to avoid having my flash trigger because that would have left a nasty reflection. I decided to bump up my ISO and use a large aperture to get this shot.
 - When your environment is fooling your light meter and you need to maintain a certain exposure setting (Figure 4.19). Beaches and snow are always a challenge for light meters. Whenever I’m shooting something in snow I find myself switching over to Manual mode.
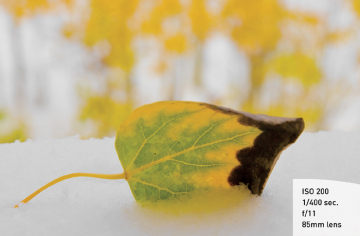 Figure 4.19. A good rule of thumb in snow is to bump your exposure up one or two f-stops if it’s really sunny. That should get you closer to the correct exposure.
 - When shooting silhouetted subjects, which requires overriding the camera’s meter readings (Figure 4.20).
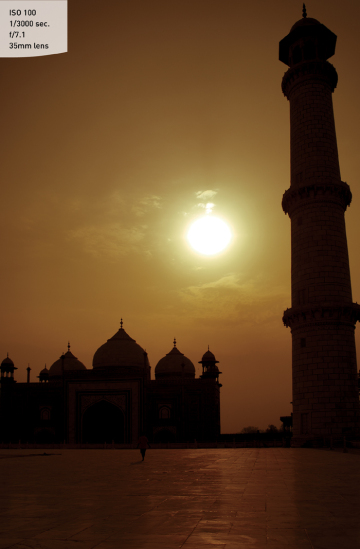 Figure 4.20. The camera’s meter will do a great job most of the time, but when you want to get creative sometimes you need to use Manual mode. Using Manual mode allowed me to silhouette the buildings while maintaining the warm glow of the sun.
Setting Up and Shooting in Manual Mode
- Turn your camera on and then turn the Mode dial to align the M with the indicator line.
- Select your ISO by pressing and holding the ISO button on the back left of the camera while rotating the main Command dial with your thumb.
- The ISO will appear on the top display. Choose your desired ISO, and release the ISO button on the left to lock in the change.
- Point the camera at your subject and then activate the camera meter by depressing the shutter button halfway.
- View the exposure information in the bottom area of the viewfinder or by looking at the top display panel.
- To set your exposure using shutter speed, while the meter is activated, use your thumb to roll the main Command dial left and right to change your shutter speed value until the exposure mark is lined up with the zero mark. The exposure information is displayed in the viewfinder using a scale with marks that run from –2 to +2 stops with 0 indicating proper exposure. As the indicator moves to the left, the image is being underexposed, or gets darker. Move the indicator to the right and the image is being overexposed, or gets brighter.
- To set your exposure using the aperture, while the meter is activated, use your finger to roll the Sub-command dial left and right to see the changed exposure values. Roll the dial to the right for a smaller aperture (higher f-stop number) and to the left for a larger aperture (lower f-stop number).
- Note: You might have good reasons to want to overexpose or underexpose an image. For instance, as a black-and-white photographer, I’ll often overexpose my images by one-third of a stop to assure that my shadows have some details. This is just one of many creative reasons for adjusting your exposure differently than is suggested by the meter.
User Settings Mode—Saving Your Favorite Settings to the Mode Dial
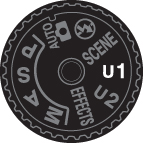
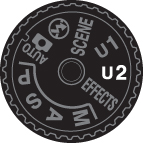
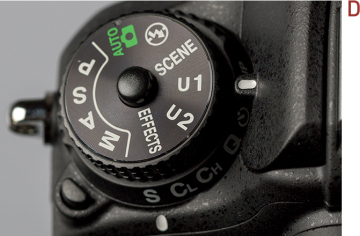
User settings are a great feature if you’re looking to have your favorite settings at the turn of a dial. These are located on the dial as U1 and U2. If you have a group of settings that you find you are using often and you want to have them close at hand, then these modes are handy for you.
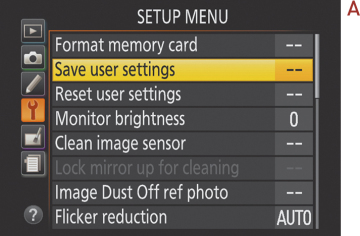
- First, set the camera to your favorite settings, under any of the semiautomatic modes or Manual mode, adjusting aperture, shutter speed, ISO, flash, focus point, metering, and/or bracketing.
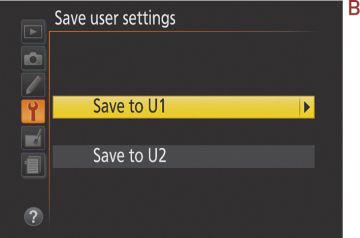
- Go to the setup menu, and click on Save User Settings (A), (B).
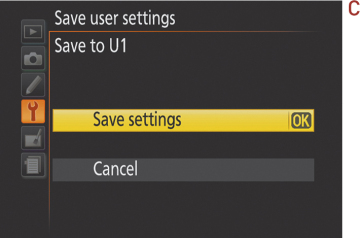
- Highlight U1 or U2, then click OK to save your settings (C).
- When you want to use those settings again, just rotate the top dial to U1 or U2, and the camera will choose your saved settings so that you’re ready to go (D).
For more on setting up user modes, see page 55 of your owner’s manual.
How I Shoot: My Favorite Camera Settings
I’m generally a landscape and travel photographer, but like many of you, I enjoy photographing everything. There’s very little that doesn’t interest me. I have found throughout the years that I primarily use the Aperture Priority mode. Why? Often when I’m traveling and focusing on my street photography, I don’t have time to worry about every single variable, and I’ve found focusing on aperture has given me the control I need for 95 percent of my photography. If I want an image to have a shallow depth of field, then I’ll use a large aperture such as f/2.8, or if I’m shooting a landscape and I need a greater depth of field I’ll use a smaller aperture such as f/16.
However, sometimes Aperture Priority just doesn’t work. Maybe the lighting is tricky or it’s close but not quite right. In those cases I’ll switch over to Manual mode. Almost all of my landscape photography that I’ve shot during the golden hours was done in Manual mode because the light changes very quickly.
Each photographer has a different way of doing things. No one approach is necessarily better than the other. In the end, it’s about creating your own system so that you’re consistent. When you’re consistent, you can measure results and then make changes accordingly.
When I first started out photographing in Aperture Priority, the biggest mistake I made was shooting with much too slow of a shutter speed. I would get blurry pictures and I would ask myself, “How did this happen? They looked super sharp when I took them.” I would then look at the metadata (image information) and would see that I shot the blurry image at 1/30 of a second, way too slow for handholding a camera. So I learned my lesson and started shooting a little faster, and my results improved immensely.
Doing things consistently and measuring results is a great way to improve your photography. Don’t ignore the metadata; it’s very helpful in understanding why an image looks a certain way and learning how to change your setting the next time to make the image stronger.
While the other camera modes have their place, I think you will find that most professional photographers use the Aperture Priority and Shutter Priority modes for 90 percent of their shooting.
One big concern that I have when I am setting up my camera is just how low I can keep my ISO. This is always a priority for me, because a low ISO will deliver the cleanest image. I raise the ISO only as a last resort because each increase in sensitivity is an opportunity for more digital noise to enter my image.
To make quick changes while I shoot, I often use the Exposure Compensation feature (covered in Chapter 7) so that I can make small over- and underexposure changes. This is different than changing the aperture or shutter; it is more like fooling the camera meter into thinking the scene is brighter or darker than it actually is. To get to this function quickly, I simply press the Exposure Compensation button, right next to the shutter button, and then dial in the desired amount of compensation using the main Command dial. If you can’t get the exact exposure you want with aperture and speed alone, make little adjustments to the exposure compensation.
One of the reasons some people change their exposure is to make corrections when there are “blinkies” in the rear LCD. Blinkies are the warning signal that part of the image has been overexposed to the point that there is no longer any detail in the highlights. When the Highlight Alert feature is turned on, the display will flash wherever the potential exists for overexposure. The black-and-white flashing will only appear in areas of your picture that are in danger of overexposure.
Setting Up the Highlight Alert Feature
- Press the Menu button, and then use the Multi-selector to access the Playback menu.
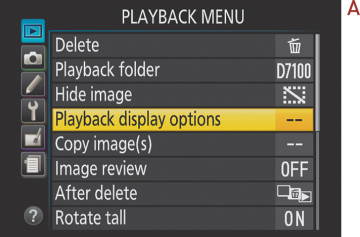
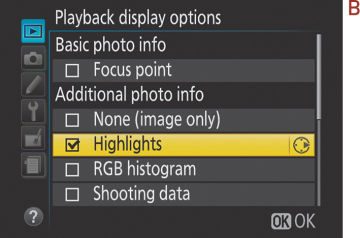
- Once in the Playback menu, move the Multi-selector to Playback Display Options and press OK (A).
- Move the Multi-selector down to select the Highlights option. Move the Multi-selector to the right to place a check mark next to the word Highlights (B).
- Press OK on the Multi-selector to lock in your change.
Once the highlights warning is turned on, use it to check your images on the back of the LCD after taking a shot. If you see an area that is blinking, try setting exposure compensation to an underexposed setting like –1/3 or –2/3 stops and take another photo, checking the result on the screen. Don’t make yourself crazy trying to get rid of every single blinking area. It is easy enough to add some black back into your photo later using post-editing software, and you don’t want to underexpose the rest of the image because there is one blown-out highlight.
Sometimes, such as when you’re shooting into the sun, the warning will blink no matter how much you adjust the exposure because there is just no detail in the highlight. On the contrary, if you’re shooting a white wedding dress and the entire dress is blinking, then you have no detail in the dress and the bride will not be happy. Use your best judgment to determine if the warning is alerting you to an area where you want to retain highlight detail. If you are not sure what the perfect exposure is and you have to get a good shot, try bracketing your exposure. We will talk more about this in later chapters.
As you work your way through the coming chapters, you will see other tips and tricks to use in your daily photography, but the most important advice I can give is to take the time to understand the features of your camera so that you can leverage the technology in a knowledgeable way. This will pay off in better photographs.